Stop Wasting Money: The Ultimate Balcony Solar Panels for Renters Guide (2026)
By UnitVerseHQ | Updated February 2026
If you’re a renter dreaming about solar energy, you’ve probably hit the same wall: you can’t drill into walls, mount equipment on the roof, or make permanent modifications to your unit. But here’s what most people don’t realize you don’t need any of that. Balcony solar panels for renters have become a legitimate, practical, and surprisingly affordable way to generate your own electricity in 2026, no landlord permission required.
This step-by-step guide walks you through everything — from choosing the right panels to safely connecting them to a portable power station. Whether you’re on the third floor or the thirtieth, this portable solar setup for balcony living is more achievable than you think.
Why Balcony Solar Makes Sense for US Renters in 2026
The US rental market has over 44 million renter households. Almost none of them have access to rooftop solar. But balconies? Those are fair game in most lease agreements, as long as you’re not drilling, bolting, or permanently modifying any structure.
A proper apartment solar kit USA setup can realistically generate 300–600Wh of energy on a good sunny day — enough to keep your router, phone, laptop, and CPAP running almost entirely off solar during daylight hours.
Here’s why renters are making the switch:
- No utility bills for essentials — offset your daily device charging completely
- Storm prep — a charged portable power station plus active solar input is serious resilience
- Zero installation cost — compared to rooftop solar averaging $15,000–$25,000 installed
- Move with you — your entire portable solar setup for balcony packs into a car trunk
The technology has caught up with the lifestyle. Let’s build your system.
What You’ll Need: The Core Components
Before we get into installation, here’s what a complete no-drill solar installation system looks like for a typical US apartment balcony.
1. Solar Panels
Look for monocrystalline panels — they’re the most efficient per square foot, which matters when your “roof” is a 6×8 ft balcony. For a balcony solar panels for renters setup, the sweet spot is:
- 100W–200W for a single-panel starter setup
- 200W–400W for a two-panel system that seriously offsets daily usage
Top picks for 2026:
- Jackery SolarSaga 200W — foldable, lightweight, purpose-built for balcony use
- EcoFlow 220W Bifacial Panel — captures light from both sides, excellent for railings
- Bluetti PV200 — solid build, great value, compatible with all Bluetti stations
2. Portable Power Station
Your solar panels need somewhere to send that electricity. This is where your apartment solar kit USA comes together. Compatible stations include:
- EcoFlow DELTA 2 (recommended — fast solar charging, great app)
- Bluetti AC180 (quieter, slightly more capacity)
- Jackery Explorer 1000 Pro (lightest in class)
Make sure your power station’s solar input matches or exceeds your panel wattage. Most 1,000Wh stations accept 400–500W solar input max.
3. Mounting Hardware (No-Drill Options)
This is where most renters get stuck. Here’s your toolkit for a true no-drill solar installation:
- Railing clamp mounts — stainless steel clamps that grip balcony railings with zero drilling
- Sandbag ballast feet — weighted bases that hold panels upright on flat surfaces
- Adjustable panel stands — freestanding A-frame stands with rubber feet
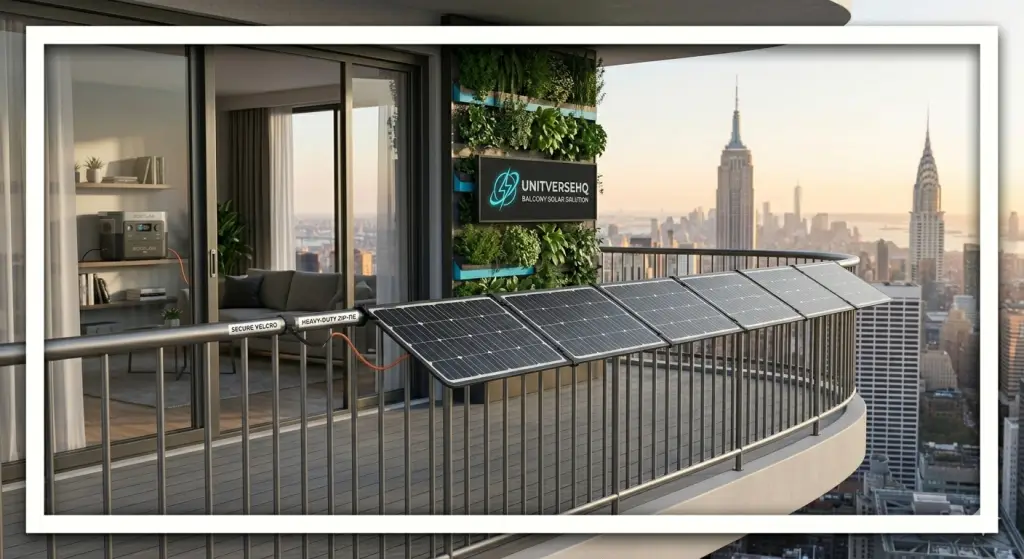
- Velcro + adhesive cable clips — for routing cables without wall damage
4. Cables and Connectors
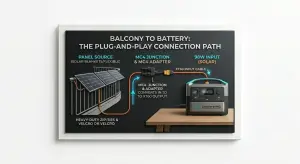
Most quality panels come with MC4 connectors and an included adapter cable for your power station. Make sure you have:
- MC4 to XT60 adapter (for EcoFlow stations)
- MC4 to Anderson connector (for Bluetti stations)
- A cable long enough to reach from your balcony into your apartment through a door gap or window
Step-by-Step: Building Your Balcony Solar Setup
Step 1: Assess Your Balcony’s Solar Potential
Before spending a dollar, spend 20 minutes observing your balcony throughout the day.
Ask yourself:
- Which direction does your balcony face? South-facing is ideal in the USA. East or west still works — expect 60–70% of optimal output.
- How many hours of direct sunlight does the space receive? Six or more is excellent. Three to four is workable.
- Are there obstructions — neighboring buildings, overhangs, trees?
Use a free app like Sun Seeker or Suncalc.net to map your balcony’s solar window precisely. This single step will save you from buying more panels than you need — or fewer than will actually work.
Step 2: Choose Your Panel Configuration
For most US apartment balconies, one of these two configurations will work:
Starter Setup (One Panel — ~200W):
- One 200W monocrystalline foldable panel
- Mounted vertically on the railing using clamp mounts
- Generates approximately 600–1,000Wh on a clear day depending on location and sun hours
- Total cost: $250–$400 for panels + mounting
Full Setup (Two Panels — ~400W):
- Two 200W panels in parallel
- One railing-mounted, one floor-standing on an adjustable stand
- Generates approximately 1,200–2,000Wh on a clear day
- Total cost: $500–$800 for panels + mounting
This is the core of any serious portable solar setup for balcony renting — keep it modular so you can expand later.
Step 3: Install Your No-Drill Mounting System
This is the heart of a true no-drill solar installation for renters. Here’s how to do it properly:
For Railing-Mounted Panels:
- Select stainless steel railing clamps rated for your railing diameter (most US apartment railings are 1.5″–2″ round or square tube)
- Attach clamp mounts to the top of your panel frame — most have pre-drilled holes for exactly this
- Slide clamps onto the railing and hand-tighten, then use a wrench for final snug fit
- Angle the panel at 15–30° off vertical toward the sun using the clamp’s tilt adjustment (if available)
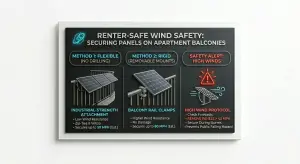
- Add a secondary safety tether — a simple bungee cord or stainless cable looped through the panel frame and around the railing adds critical wind resistance
For Floor-Standing Panels:
- Set up your adjustable A-frame stand with rubber feet on the balcony floor
- Angle toward south (or your optimal direction) at 30–45° tilt for best output
- Fill sandbag ballast feet if your stand supports them — critical for best solar panels for small spaces setups on exposed high-rise balconies
- Do not place near the balcony edge where wind uplift is strongest
Step 4: Address Wind Safety — Especially for High-Rise Renters
This step is non-negotiable if you’re above the fifth floor. Wind loads on unsecured solar panels can be genuinely dangerous — both for your equipment and for anyone below.
Wind safety rules for balcony solar:
- Never mount panels flat (horizontal) — this maximizes wind lift. Always angle or stand them vertically or near-vertically
- Use secondary tethering on every panel — railing clamps alone are not enough above floor 8–10
- Check wind forecasts — if sustained winds above 25 mph are expected, bring panels inside or lay them flat temporarily
- Stick to panels under 10 lbs for railing mounts — heavier panels need floor stands with ballast
- Inspect clamps monthly — vibration from wind can loosen hardware over time
Foldable panels like the Jackery SolarSaga or EcoFlow 220W are particularly good for balcony solar panels for renters in high-rise buildings because they can be folded and stored quickly when weather turns.
Step 5: Route Your Cables Indoors
Getting power from your balcony panels to your indoor power station is simpler than most people think.
Option A — Sliding Door Gap (Most Common): Most sliding glass doors have a small gap at the bottom track when closed. A flat MC4 extension cable (2–3mm profile) fits through this gap without damaging the door seal. This is the most popular solution in the apartment solar kit USA community.
Option B — Window Gap: Casement windows work similarly. Route the cable through the bottom corner, use an adhesive foam weather strip on either side to seal the gap.
Option C — Dedicated Balcony Pass-Through: Some apartment balcony doors have a built-in cable pass-through knockout at the base. Check yours — you may already have one.
Once inside, use adhesive cable clips to route the cable neatly along the baseboard to your power station. No tape marks, no drilling, no lease violations.
Step 6: Connect to Your Portable Power Station
This is where your portable solar setup for balcony becomes a working power system.
- Confirm your panel’s MC4 output cable matches your station’s solar input (use the appropriate adapter if needed)
- Plug the solar cable into the station’s solar input port — most EcoFlow and Bluetti stations have a dedicated XT60 or Anderson solar port
- Power on the station and check the input reading on the display or app
- On a clear day with a 200W panel, you should see 120–180W of actual input (real-world conditions are always slightly below rated wattage)
- Enable pass-through charging mode on your station — this lets you run devices while simultaneously charging from solar
That’s it. Your no-drill solar installation is live and generating power.
Maximizing Output From Your Balcony Setup
Getting your system installed is step one. Getting the most from it is step two.
Tilt optimization: In the continental USA, angling panels toward true south at a tilt equal to your latitude gives optimal annual output. In Los Angeles (34°N), aim for 34° tilt. In New York (41°N), aim for 41°.
Bifacial panels on railings: EcoFlow’s bifacial panels capture reflected light from below and behind — a significant advantage when mounted vertically on a railing above a concrete balcony floor.
Keep panels clean: Dust and bird droppings cut output significantly. Wipe panels with a damp microfiber cloth weekly. No harsh chemicals needed.
Parallel vs. series wiring: For best solar panels for small spaces setups with two panels, wire in parallel (same voltage, doubled current) rather than series. This handles partial shading better — critical when one panel gets shaded by a neighboring building.
Safety Checklist Before Going Live
Before you power up your system, run through this quick checklist:
- ✅ All railing clamps hand-tight plus wrench-tightened
- ✅ Secondary tether on every railing-mounted panel
- ✅ Cable routed away from foot traffic paths on balcony
- ✅ No cable pinched by door or window when closed
- ✅ Power station sitting on flat, stable, ventilated surface indoors
- ✅ Solar input reading confirmed on station display
- ✅ Sandbag ballast filled and positioned on floor-standing panels
What This System Can Realistically Power
Here’s an honest breakdown of what a 200W balcony solar panels for renters setup can run on a typical sunny day in a US city:
| Device | Daily Usage | Covered by 200W Setup? |
|---|---|---|
| Wi-Fi Router | ~10Wh/day | ✅ Yes, easily |
| Smartphone (x2) | ~20Wh/day | ✅ Yes |
| Laptop | ~60Wh/day | ✅ Yes |
| LED Lighting | ~30Wh/day | ✅ Yes |
| CPAP Machine | ~30–60Wh/night | ✅ Yes (stored in station) |
| Mini Fridge | ~400–500Wh/day | ⚠️ Partial offset only |
| Window AC Unit | ~1,000Wh+/day | ❌ Not practical |
A complete apartment solar kit USA with 200W of panels and a 1,000Wh power station handles all your daily essentials and charges the station for overnight use a genuinely self-sufficient setup for careful energy users.
Frequently Asked Questions
Is it legal to put solar panels on an apartment balcony?
In most US states, yes. Many states have “solar access laws” that prevent landlords from outright banning solar installations. However, lease agreements vary. Since a no-drill solar installation makes zero permanent modifications, most landlords have no grounds to object. Always review your lease and consider sending a simple notification (not a request) to your property manager.
How much does a balcony solar setup cost in the USA?
A starter apartment solar kit USA one 200W panel, mounting hardware, and a compatible power station runs between $800–$1,500 total. Panels alone are $200–$400. The power station is typically $500–$1,000. Return on investment comes through reduced electricity bills and outage preparedness.
Will my balcony solar panels work on cloudy days?
Yes, but at reduced output — typically 10–25% of rated wattage on heavily overcast days. The best solar panels for small spaces use high-efficiency monocrystalline cells that perform better in low-light conditions than cheaper polycrystalline alternatives.
Can I use balcony solar panels with any portable power station?
Almost any station with a solar input port will work. Confirm that the panel’s voltage (Voc) falls within the station’s acceptable solar input range before purchasing. Most EcoFlow and Bluetti stations accept panels with a Voc of 10–60V, which covers virtually all consumer panels designed for portable solar setup for balcony use.
What if my balcony faces north?
North-facing balconies in the northern hemisphere receive the least direct sunlight. It’s still workable — you’ll generate meaningful power during summer months when the sun is high — but expect 40–60% of the output a south-facing balcony would produce. Bifacial panels help maximize whatever indirect light is available.
How do I store the panels during bad weather?
Foldable panels are the best solution for balcony solar panels for renters who need flexibility. Most quality foldable panels collapse to suitcase size in under 60 seconds and store flat under a bed or in a closet. Rigid panels mounted on railing clamps should be untethered and brought inside or laid flat on the balcony floor when sustained winds above 25 mph are forecast.